Why do Preppers need Comms?
During times of crisis, there is a greater need to have a flow of information. This concept is even more important to the Prepping Community. We have to have knowledge of what is happening in our Local and Regional areas, as well as across the globe. This is where Communications comes into play, the ability to keep the flow of information going is going to be paramount during an SHTF situation, it is also extremely important to know how to use your Communications Equipment before any type of event happens.
This is what this blog will be about, me giving advice from my 10+years as an Amateur Radio Op to the Prepping Community.
We as Preppers need to have a flow of information coming in and going out during an SHTF situation. Do you know how to use that $25 Made in China Radio? Do you know the National Calling frequency for the 2 Meter Band, how about the 70 Centimeter Band?
Do you, and your group have a Communications Plan in place? Do you practice your plan?
This site has been set up to give you, my Fellow Preppers, the information necessary to have communications capabilities for you M.A.G., your Group, or your Tribe. As I am in the USA, all of the information I give here will be based on the rules that govern radio communications here in the United States.
It is my hope that what I write here will help you, and your group if you are in one, to make Communications a part of your Preps.
73! K0MRD.
The Prepper Comms Plan
It is imperative to create a communications plan with your group in case an SHTF situation ever happens. I will give you an idea of what should be in your Communications plan, please use it and edit it to suit your group’s needs.
The first thing that you will need is a way to communicate with each other, this could be Amateur Radio, CB, FRS/GMRS, or your cell phones. Each member of your group should have the same information, ie Frequencies programmed into your radios, times to monitor (listen), and times to transmit.
I have been following AmRRON’s Ch3 idea, which is to monitor 146.420 MHz on the 2 Meter band, to see if anyone requires assistance. I also monitor CH3 on my CB at the same time, in order to pass any information to the 2 Meter frequencies. All of this is done at specific times that are set forth by AmRRON. This has given me the idea to set this up here, so that you all, my viewers can utilize the same principles in your Comms Plan.
What actually goes into the Comms Plan? It’s simply setting up before any SHTF situation, the means to communicate. I’ll break this down…
1)Who are you going to be communicating with?
2) What manner of communication are you going to use?
3) WIll there be a time’s table for monitoring your chosen method of communication?
4) Does everyone in your group understand these items that you’ve set up?
For me, I choose HAM Radio. I will monitor the National Calling frequency for 2 Meters which is 146.520 for 10 minutes every hour. Simultaneously monitoring Ch3 on my CB.
I will also participate in local nets on the 2 Meter Band on the respective repeaters. I also have my cell phone ready to text people who are out of my area to let them know that we are doing alright, or not. This way they can have peace of mind, should something happen in my local area.
IF you want to set up a Comms plan with your group, then you will have to come to an understanding of what methods you will use, if it is HAM Radio you will need to decide what simplex frequency to use, and if you are using repeaters, then you will need to know the frequencies 146.*** as Recieve Frequency and 146.**1 (just an example not actual repeater frequencies) as the Transmit Frequency, any Tones that the repeater owner has set up, and if the repeater is open. For example 146.*** – (negative Shift) and the Tone used on the repeater 114.8
All of that information can be found at RadioRefrence.com or RepeaterBook.com.
The idea is to have this set up before an SHTF situation happens, and practice your plan, as you practice with your other preps.
That’s all for now, this is K0MRD your Radio Prepper signing off. 73!

Comms 101
Before you go to buy comms gear, there are questions you need to ask yourself…
- Who am I trying to contact?
- How far away do I want to communicate?
- What means of communication do I/We already have?
- What are the legalities of owning amateur radio/FRS/GMRS/CB gear?
- What are the legalities of broadcasting (pushing the Push to Talk Button) on any of the licensed radio services without a license?
The first question should be pretty easy, you family/friends/M.A.G. This type of communication is the common, everyday phone call/text to get information to whom needs it.
The second question is a bit more complex, as most preppers are under the impression that having a Baofeng is the be-all, end-all of local communication. The truth is that the range of a dual-band handheld radio in simplex operation (radio to radio) is about 3 miles without obstructions. In an urban/suburban setting, the range is cut in half due to the presence of buildings and the like. These little radios are FM, which means that obstructions can disperse the signal. While FM is great for noise cancelation, and clarity of signal, it does have its limitations.
A high antenna is good to have if you are in a base station, the higher above the tree line the better. On your hand-held radios, the antenna that comes with the radio is crap plain and simple. You should at your earliest possible time, get an aftermarket antenna that is correct for your radio, IE a dual-band 2 meter/70CM antenna]. If you get the wrong antenna, your radio will not work.
The reason people, not just preppers, like these little radios, is because they are inexpensive. The drawback is that they are only good for local communication and by local, I mean your neighborhood unless you are able to access a repeater. A repeater is a device that extends the reach of your Baofeng radio, to put it very simply. You input the listening frequency, then the transmit frequency, then the CTSS code if any, and then you have access to the repeater.
On the Baofeng itself, this is a tedious task; however, it can be accomplished with a free program called CHIRP, and I will put a link for it in the description. With repeater access, your radio’s reach is extended a lot, like 20 to 30 miles. Plus, anyone accessing the same repeater will be able to communicate with you. But in an SHTF situation do not count on repeaters working, they are run on batteries/generators and the gas will run out.
So while the little handy-talkies are great right now for comms, if the worst should happen and the repeaters go down, they would only be good for team/group comms.
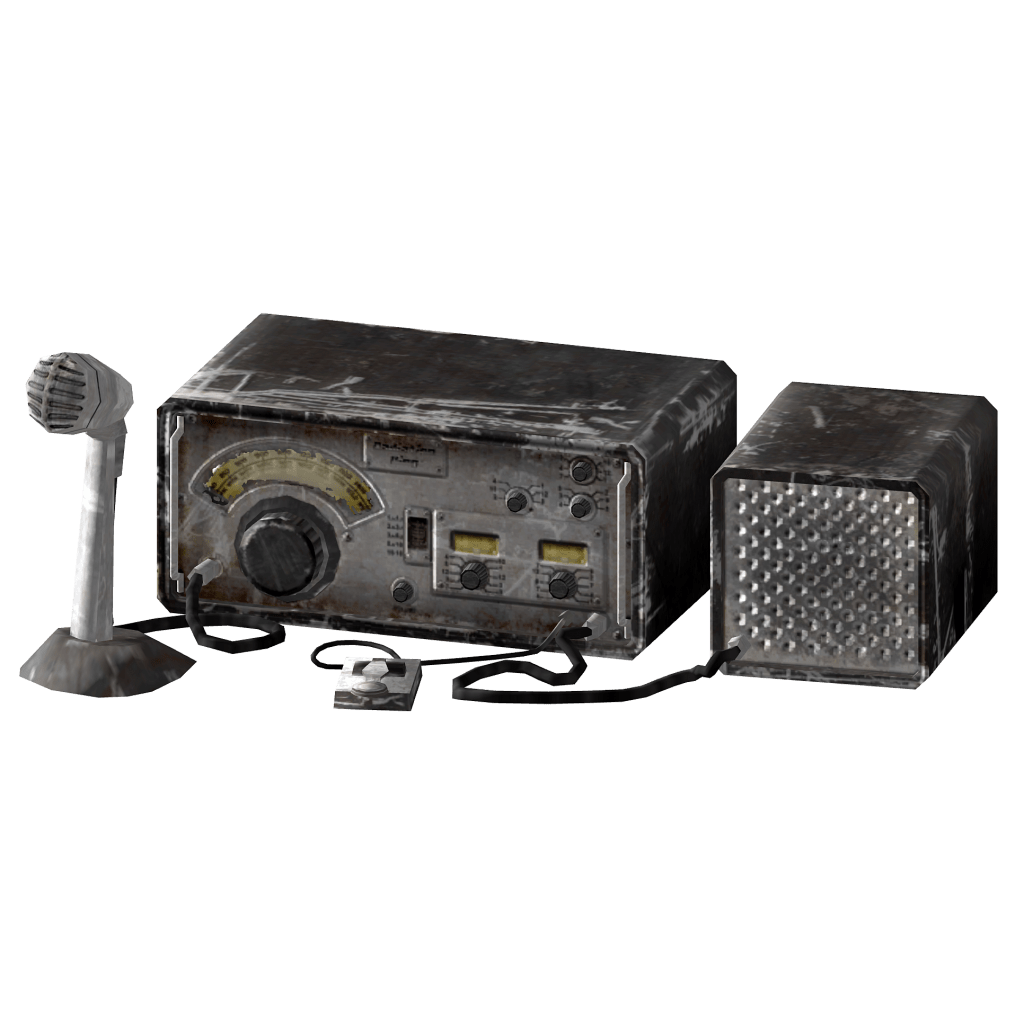
This is why you would want to go for an HF radio. HF or High-Frequency radios enable regional and worldwide comms.
But before we get into that, what means of communicating do you already have?
Probably a cell phone at the very least. In an SHTF situation, how effective will they be? During any localized disruption (hurricane, tornado, ice storm, etc.) the cell towers will be overloaded with people trying to call family and the like. But texting is a good alternative to calling because it takes up less bandwidth on the cell towers, much like Morse Code, which uses a narrow bandwidth itself.
How far away do I want to communicate? That depends on two main factors, the power output of your radio and the type of antenna you have. Let’s break this down…
Power.
Power output is what gives you signal more punch. More power out radiates more RF, which you will want to consider when using an HT (Handy Talky).
According to the American Cancer Society, RF is a type of non-ionizing radiation which means it does not have enough energy to remove electrons from an atom. If RF is absorbed into the body in large enough amounts, it can cause heat, which in turn will cause burns to the skin. But the amounts of RF radiation would have to be INTENSE to cause a burn. That said, I would not get a hand-held radio that put out more than 8 Watts for safety’s sake, if it is high power you seek, get a mobile unit, they are higher powered; in the area of 25 to 65 Watts or more, and they can be used as a base station.
Power output is not the only consideration you have when choosing a radio, you have to think about the antenna that is connected to your radio as well.
Antennas.
A) HT’s and Vehicle Mounts
Most hand-held radios come with, what is commonly called a “Rubber Duck” antenna. They do work, but they are not the best. It is a common practice for radio operators to purchase an aftermarket antenna in order to receive and transmit farther. If you would like to use your hand-held radio in your car, you can get a magnetic mount dual-band antenna and temporally mount it to the car/van/APC whatever you have. There are permanent antenna mounts available, however, they require drilling into the body/trunk of your vehicle, so I am sticking with mag mounts for this video.
B) Base Station Antennas
If you have a base station, and that includes HTs, then you are going to want to have a permanent/semi-permanent antenna set up as high as possible above the tree line in order to get a signal out and in. Most of these are going to be vertically polarized for 2 Meter/70 CM radios, or they can be Omani directional like a Mag Mount listed above. The ideal antenna for a permanent antenna is called a Copper J-Pole. These could either be purchased from places like Amazon, or Ham Radio Outlet, or they can be built by a radio operator with the right knowledge of antenna theory.
So how does this all connect to radio comms distance?
In short, the higher the antenna you have, and the more power your radio, the signal reach is much farther.
2 Meter/70CM radios are FM, which means that they are Line of Sight. What that means is that the radios have to “see” each other in order to communicate to each other, and if they are over the “radio horizon” there will be no contact. For this reason, a high antenna is best for radio-to-radio communication. Couple the antenna with power output, and you have a great communication system in place.
Some facts:
UV5R’s running Simplex (Radio to Radio) can expect 1 to 5 miles of radio contact. That’s not too bad if you are using the radio for group comms and the like. If you wanted to reach beyond that 1-to-5-mile mark, you would need to access a repeater. What is a repeater? “An amateur radio repeater is an electronic device that receives a weak or low-level amateur radio signal and re-transmits it at a higher level or higher power so that the signal can cover longer distances without degradation.” -Wikipedia.
In layman’s terms, a repeater listens for weak signals (like from a UV5R) and re-transmits over a wider distance, in the 30-to-50-mile range. If there are repeaters that are linked, that range grows. Not all repeaters are linked though.
In an SHTF situation, repeaters might be down, due to damage from a storm, or if there is a grid down type of situation. and they should not be depended upon in those times.
High-Frequency radios, do not depend on repeaters for communications. It is just radio and antenna, and power. Some Frequencies are seasonal dependent, and some are even daylight dependent.
I like to use 20 meters, as it is stable all year long, but it is a daytime frequency. I need to get a good 40-meter antenna, as it is best at night/early morning.
Radio communications is a hands-on skill, so if you are going to buy and listen to a UV5R, or any other Ham Radio I want to encourage you to get an Amateur Radio license. Because expertise comes with use. I say this because you would learn more from doing than you could by listening to me prattle on about radios. You would not buy a piece of gear, and not learn all the ins and outs of said gear, you would want to know what its capabilities and limitations of that gear are, it is this way with comms, you learn by doing.
That’s all for now. This is K0MRD your Radio Prepper signing out, 73!
CTCSS, what is it? And why do we use it?
I have been asked to explain what CTCSS is. CTCSS stands for Continuous Tone Squelch System. It is a set of codes that can be programmed into your Handheld Transceiver so that you will not be disturbed by others that happen to be on the same frequency. As an example, Group Alpha is on Ch 1 with no CTCSS code, while Group Bravo is on the same frequency, but with a code of 60.7 Hz, and Group Charley is on the same frequency with a code of 114.8. Bravo will not be able to hear Charley, and Charley will not hear Bravo, however, Alpha will hear both as that group does not have a CTCSS code set. So as you can see from the above example, there really is no privacy over the airwaves, the use of obscuring codes, or phrases is strictly VERBODEN by the FCC on Amateur radio. The CTCSS codes do give a measure of privacy, but not as much as people would like. Below is a list of CTCSS tones
CTCSS (Continuous Tone-Coded Squelch System) Codes
| CTCSS | Hz | CTCSS | Hz | CTCSS | Hz | ||
| 1 | 67.0 | 14 | 107.2 | 27 | 167.9 | ||
| 2 | 71.9 | 15 | 110.9 | 28 | 173.8 | ||
| 3 | 74.4 | 16 | 114.8 | 29 | 179.9 | ||
| 4 | 77.0 | 17 | 118.8 | 30 | 186.2 | ||
| 5 | 79.7 | 18 | 123 | 31 | 192.8 | ||
| 6 | 82.5 | 19 | 127.3 | 32 | 203.5 | ||
| 7 | 85.4 | 20 | 131.8 | 33 | 210.7 | ||
| 8 | 88.5 | 21 | 136.5 | 34 | 218.1 | ||
| 9 | 91.5 | 22 | 141.3 | 35 | 225.7 | ||
| 10 | 94.8 | 23 | 146.2 | 36 | 233.6 | ||
| 11 | 97.4 | 24 | 151.4 | 37 | 241.8 | ||
| 12 | 100.0 | 25 | 156.7 | 38 | 250.3 | ||
| 13 | 103.5 | 26 | 162.2 | 122* | 69.3 |
I hope that this helps you understand what CTCSS is and its use in Communications. This is K0MRD, your RadioPrepper signing out, 73!
Manually Programing a Baofeng UV-5R

I have posted the following on my discord, kØmrd_radioprepper#4605 check it out for more Ham Radio, and Communications information, now without any further ado here we go….
How to manually program a repeater channel
Step 1. Press [VFO/MR] and enter Frequency Mode.
Step 2. Press [A/B] and choose the A-Side (upper display).
Like the simplex channels, the A-side must be used to program the repeater channels into the radio.
Programming data entered on the B Side (lower display) will not be saved.
Step 3. Press [BAND] for the frequency band
Toggle [BAND] to choose 136 MHz (VHF) or 470 MHz (UHF).
If the incorrect band is chosen for the frequency entered in Step 6, the radio will cancel the operation.
Step 4. optional – Clear any CTCSS/DCS codes previously assigned to the channel.
If no previous codes exist or when setting up the channel for the first time and no codes are needed, set
the menu items listed below to OFF.
RX DCS – [MENU] 10 [MENU] [enter 0 (OFF)] [MENU] [EXIT]
RX CTCSS – [MENU] 11 [MENU] [enter 0 (OFF)] [MENU] [EXIT]
TX DCS – [MENU] 12 [MENU] [enter 0 (OFF)] [MENU] [EXIT]
TX CTCSS – [MENU] 13 [MENU] [enter 0 (OFF)] [MENU] [EXIT]
Step 5. Disable TDR (DualWatch/Dual Standby).
Press [MENU] 7 [MENU] [press up/down arrow keys] OFF [MENU] [EXIT]
It is highly advised to turn TDR off when programming directly from the radio.
Step 6. optional – Delete any existing data on the channel to program.
Skip this step when setting up the channel for the first time.
Press [MENU] 28 [press up/down arrow keys to choose channel number] [MENU] [EXIT]
It is highly advised to turn TDR off when programming directly from the radio.
Step 7. Enter the repeater output (your receiving) frequency.
Use the keypad to enter the frequency into the radio.
Step 8. Input the repeater frequency offset.
Press [MENU] 26 [MENU] [enter the offset for 2 meter or 70 cm repeater] [MENU] [EXIT]
Step 9. Enter the Transmit Frequency Shift.
Press [MENU] 25 [MENU] [enter 1 for positive shift or 2 for negative shift] [MENU][EXIT]
Step 10. optional – Enter the transmit CTCSS/DCS code.
CTCSS – [MENU] 13 [MENU] [enter/choose code XXXX] [MENU] [EXIT]
DCS – [MENU] 12 [MENU] [choose code XXXXX] [MENU] [EXIT]
Step 11. Assign the receive frequency entered in Step 7 to the channel.
[MENU] 27 [MENU] [enter channel number XXX] [MENU] [EXIT]
Step 12. Press the [Scan] button to activate Reverse Mode and display the transmit frequency. Step 13. Assign the transmit frequency to the channel. Press [MENU] 27 [MENU] [enter the same memory channel entered in step 12] [MENU] [EXIT] Step 14. Press the [Scan] button to exit Reverse Mode.
To add more channels, simply repeat the steps above. If these step-by-step instructions are followed
correctly, you should be able to program all 128 channels (000-127) in your Baofeng UV-5R as you need.
Yes, it is a 12 step process. I feel that anyone who owns a UV-5r should know how to manually program the radio just in case you ever find yourself needing to program a repeater and you do not have a computer at hand in order to use CHIRP. The process is not as easy as some other radios, but once you’ve gone through the process, it gets easier with repetition.
.That’s about all for now, stay prepped and 73! K0MRD your Radio Prepper signing out
Comms Initiative PT 1

This is an initiative that I am borrowing from another group. This comes from AmRRON, the American Redoubt Radio Operators Network. This could be a great tool in our Prepping tool kit. I propose a net happening regularly in your area.
A ‘Net’ is a regularly-scheduled communications network and is a great way to practice, become proficient with your equipment, and make contact with like-minded preppers and patriots in your area.
The reasoning behind this initiative is to get more people using the communications equipment that they have on hand. Communication during an SHTF Situation is paramount for survival, you will need to know what is happening, where it’s happening, and who is involved.
If you only have a CB Radio, then you can use it to gather and disseminate information. True it is s short-distance communication device, but with the proper antenna height, you can receive and transmit signals just fine.
Ham Radio can be used for a longer range, and the Ham Ops should have a CB unit to monitor ch 3 in order to relay any information that comes via that avenue on the Ham Radio Frequencies locally, regionally, and worldwide.
Ham Radio is licensed by the FCC here in the US, and before you say “But in an SHTF Situation licenses will not matter” think about this, would you pick up a firearm that you’ve never practiced with and be able to be an expert in its use? No. Ham Radio is no different, these are not “Plug and Play” items, and you have to actually know how to use them. That comes with practice and getting a license is the best way to start. I am well aware that some in the preparedness community do not want to “Be on a government list”, here’s a knowledge bomb for you, you are on a government list if 1) you own your own home, 2) Own a vehicle of any kind 3) have a Social Security Card. You were placed on a government list on the day you came into this world kicking and screaming.
Getting a license means that you have taken the time to learn how to use this type of equipment, just like driving a car.
Ham Radio is a way to “stay in the loop” before, during, and after an SHTF situation. When Mother Nature sends storms to your area Cell towers may very well be down, and power could be out but Ham radio can be operated via a battery, so it is a great option to have available to you.
Ham Radio does have some requirements, like needing a license to operate the radio. To get a license requires taking a 35 question, multiple-choice test. You can take a practice test at the ARRL website, or QRZ.Com for free until you consistently score at least 80%. The next step would be to find a local Ham Radio Club, as they generally offer the Technician (the first license for Amateur Radio in the USA) test at least monthly.
The Cost for the test currently is $15, which is going to increase to $35 in the near future so if you are actually considering getting your license, I would do so A.S.A.P.
The License is good for 10 years, so even at $35, it breaks down to like $3.50 a day, and in a “Hobby” where equipment can cost $1,000 ‘s of dollars, $35 per 10 years ain’t so bad.
You may have noticed that I put the word hobby in quotes that’s because some people only see what we do as a hobby. In fact, we are more than that, we provide service in times of crisis. During Hurricane Katrina, there were Ham Radio ops in and around New Orleans relaying health and welfare information out of the affected area. When Hurricanes Irma and Maria blasted Puerto Rico, Ham Radio Ops went down to establish communications for the whole Island. And this was done all without getting paid one red cent.
Now think about it this way, should an SHTF situation come, would you want to be able to communicate with other, like-minded people in order to coordinate relief efforts for yourself/MAG/TRIBE or Group? I know I would want a way to at least gather information, not necessarily INTEL, but information as to what is going on.
That’s going to be all for now, next time I’ll talk about the gear necessary
for HAM communication as well as CB.
Until Next time, this is KØMRD, your Radio Prepper signing off. 73!
Comms Initiative part 2 the Gear.
To start with, you do not need to get the biggest and best gear, quite frankly because it costs way too much.
Most preppers I know have started out with a Baofeng UV-5R like the one pictured:
This is a dual-band Amateur radio, meaning that it is capable of transmitting and receiving on the 2 Meter band (144.0 to 146.8 MHz) and on the 70 Centimeter Band (420.0 to 450.0 MHz) these are the Technician level authorized bands. For $25.00 on Amazon, you cannot go wrong.
Included in the Tech License are limited privileges on the 10 Meter band (28.300 to 28.500) for Single Side Band phone (voice) operation Anytone makes a good 10-meter radio for a decent price, see below for pic
The price tag on this is $137.68 at the time of writing this.
The 10 Meter band privileges open up longer-range comms for preppers.
If you only want a CB, don’t worry, they can be had just about everywhere from Walmart to any truck stop along the Highways, or your granddad’s garage.
CB is short-range comms, yes, but when the conditions are right you can talk longer distance (Shooting SKIP) than you could under normal conditions. A word of caution, do not expect to be able to Shoot Skip all the time, it won’t happen. Shooting Skip is dependent on Solar Flares, or Sun Spots. These Solar Flares shoot free electrons out into space, the electrons are then caught in the Earth’s Ionosphere and this allows for Skip to happen. No sunspots, no skip.
So why have a CB for coms if it is short-range? Simple an Amateur Radio op should be monitoring CB as well as the Ham Radio Bands, that way the op can pass along any information that is of use to others.
That is the whole gist of this initiative, to get both forms of comms, Amateur, and CB to work together. By monitoring a certain channel on CB and on the Ham Bands an Operator can pass along health and wellness information, as well as information on conditions in your area to those outside your area during an SHTF situation.
CB radios can be had for $30.00 all the way up to $300 dollars if you want all the new bells and whistles.
That’s about all for now, thanks for taking the time to read this I hope that it is of use to you in some way.
This is KØMRD signing off, 73!

Wilderness Protocol, is it really necessary?
The Wilderness Protocol is simply a recommendation that those outside of repeater range monitor standard simplex channels at specific times in case others have priority or emergency calls.
“FM & Repeaters”, June 1996 QST, p. 85.
With Spring right around the corner, many of us will be taking to the outdoors for recreation, whether that is camping, hiking, or anything in between. As Preppers we like to have things in place “Just In Case”. If you are out in the backwoods, far outside of repeater range this is where the Wilderness Protocol comes in. Should an emergency happen, you can be confident that there is someone monitoring the National Calling Frequencies. This is not only for Amateur Radio, but GMRS and CB as well.
So what are the frequencies to monitor then? I am so glad you asked, because I will list them below:
Simplex frequencies:
146.52 <– primary
446.0 ←- 70 CM
223.5 ←- 1.25 Meter
52.525 ←- 6 Meter
1294.5
Monitor at least
07:00 – 07:05
10:00 – 10:05
13:00 – 13:05
16:00 – 16:05
etc.; if possible, monitor every hour.
Priority/Emergency transmission: begin with 10 seconds of DTMF “0” (this
is called LiTZ, “Long Tone Zero”, and is a good idea for repeaters as well).
For GMRS the frequency is 462.675 tone: 141.3 (Ch20) is the National Emergency Calling Frequency, and for CB there is Channel 9 is the Universal Emergency channel, which is monitored by local Law Enforcement, so use it only when necessary.
Routine transmission: wait until four minutes after the hour.
Now, why would we use the Wilderness Protocol? If you are out hiking, and an emergency happens, you get hurt in some way, and you are out of repeater range, you would choose one of the highlighted frequencies to transmit an emergency signal.
Anyone monitoring that frequency may be able to hear you and get you the help you need. Conversely, you could be monitoring one of the frequencies from your Shack, and you pick up a distress signal from someone out in the woods, you could communicate with them getting as much information as to their whereabouts as you can, all the while you would be reaching out to local Rescue Services and give them the same information.
So, in my not so humble opinion not only is it necessary, it should be part of your Communications Plan, to begin with.
That’s about all for now, this is K0MRD, your Radio Prepper, signing off. 73!
AFTER ACTION REPORT!!!!!
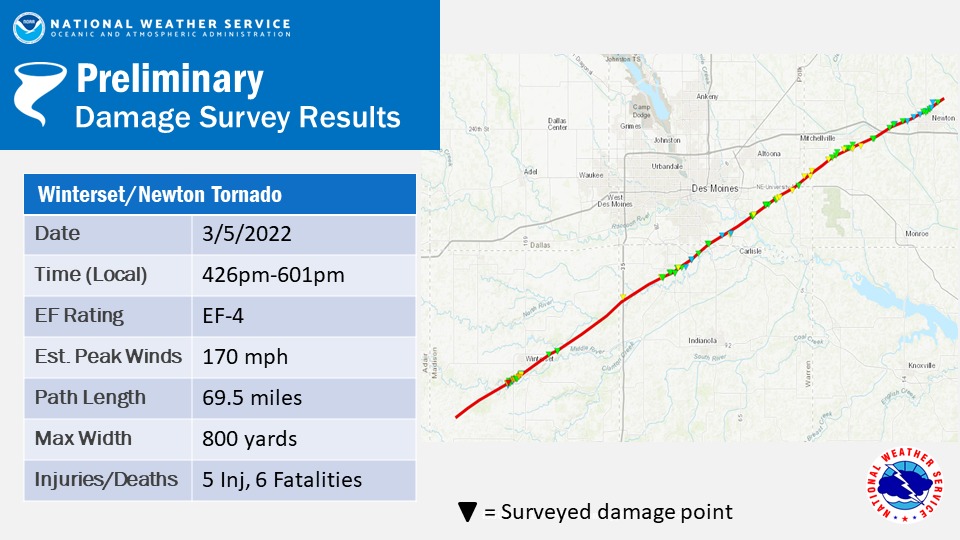
After action report,,,,, after-action report….. after-action report…… On Saturday last there was a tornado, an EF 4, that touched down in my town, me and Mrs. RadioPrepper survived unscathed save the loss of power for 4.5 hours. Others in town were not so lucky.
A friend of ours lost their stables and home to the storm. All of their animals are safe and sound, and the family all survived.
While Mrs. RadioPrepper was in our safe area (our bathroom) with our fur babies, I was monitoring our local 2-meter repeater, passing along information about the storm in the immediate area.
After we lost power, I was relegated to using my UV-5R with a mag-mount antenna in my home. I was able to keep in communication with the local repeater on backup (battery) power. Unfortunately, I was not able to record the activity, hence this after-action report.
This is why I got into Ham radio in the first place, to get info and pass the information along. I would strongly encourage all of my prepper fam to get their Ham radio license in order to practice for just such a situation.

2-meter Emergency Communication Go Box
Three weeks ago (at the time of this writing) my town was hit by an F3 tornado, which is way more frightening sounding than it actually is. There is still property damage from the twister, however, my home and the immediate area were more or less undamaged. While the storm was happening, my wife and our two cats were in our safe room, and I was acting as a storm- spotter while maintaining communications on my local repeater. That was until we lost power…
My main 2-meter radio instantly turned into a glorified paperweight, and I still needed to maintain radio comms, so I was left with my Baofeng UV-5R and my mag-mount antenna. I was able to get my messages out, but it was a bit of a struggle with the storm raging. Once the storm passed I got to thinking that I need an emergency go box just for the type of situation we had just gone through, to that end I decided to build one.
First I needed a plan….
Step 1) The Requirements:
- Simple
- Self-Contained
- Weatherproof
- Modular
- Power enough for Amp and Radio (UV 82?)
Step 2) The Items on hand
- .50 Cal Ammo Can, the basis of the box
- 2-meter amp
- Baofeng UV-5R
- A jumper from Amp to radio Antenna
- Power panel ( quad outlet ) with wiring harness
- 12 v 5-12 Ahr SLA battery (amazon).
Thus my 2-meter Emergency Communication Go Box was born. The hardest part to figure out was how to mount the quad outlet power panel in the ammo can. As there are no interior lips to screw it to, this became a maddening problem for me.
The answer came to me as I was in one of the Big Home improvement stores (the Orange one) and saw a 4x4x4 junction box that would work perfectly, and would keep the modularity that I had sought for this project.
I fitted all of the components of the kit together, and to my surprise, they all fit together as if they were made for this project. To keep each component in place, since I did not want to compromise the integrity of the ammo can, I used an industrial hook and loop fastener on each as well as on the inner wall of the ammo can.
Thus far, I have not had to use the emergency kit, but the next time the power goes out I know I’ll have the means to get my signal out.
Follow along on my Youtube channel for the actual build at:
